How to Make a Transparent PNG for T-Shirts (and Avoid Halos)
Make a transparent PNG for t-shirts that prints cleanly: remove white backgrounds, fix halos and soft edges, test on dark shirts and export it correctly.
By the POD Made Easy team · September 24, 2026 · 11 min read
A great design can still print badly if its background isn’t handled properly. The classic results are a white box around the artwork on a black shirt, a thin pale outline that makes the design look cut out with scissors, or a faint rectangle that seems to come from nowhere. All three are transparency problems, and all three can be fixed before you upload the file.
The short version: remove the background completely, clean the edge pixels so none of the old background color is left, and export a PNG-24 with transparency (sometimes called PNG-32 or RGBA) at the exact print-area size. This guide covers why transparency matters for direct-to-garment (DTG) printing, what causes halos, how to remove a white background cleanly, how to check your file and which export settings to use. You don’t need Photoshop or design training: free tools work fine if you follow the method.
Key takeaways
- Apparel designs need a PNG with a real alpha channel. JPG can’t store transparency at all.
- Halos come from edge pixels that still contain the old background color, usually white.
- Semi-transparent pixels print unpredictably on DTG, so harden soft edges, shadows and glows.
- Check every file on a checkerboard, on black and on white, zoomed in to at least 200%.
- Export as PNG-24 with transparency (sometimes called PNG-32), never PNG-8 or JPG.
Why transparency matters on DTG shirts
POD t-shirts are commonly printed with DTG: an inkjet printer that sprays water-based ink straight onto the fabric. On colored and dark garments, the printer first lays down a layer of white ink, called the underbase, so the colors on top stay bright. That underbase goes wherever your file has pixels.
So if your file has a white background, the printer prints a white rectangle. It has no way of knowing the white was meant to be “nothing”; to the printer, it’s artwork. On a white shirt you might never notice, because white areas usually aren’t printed at all and the shirt itself provides the white. Put the same design on a navy or black shirt and the box appears.
Transparency is stored in an alpha channel: an extra value for every pixel that runs from fully transparent to fully opaque. A PNG can carry one. A JPG can’t, which is why a JPG always has a background, even when that background is white. Direct-to-film (DTF) printing, which some providers also use, has the same needs, because it prints a white layer behind your colors too. (For how the two methods differ, see DTG vs DTF printing.)
Semi-transparent pixels and halos, explained
Look closely at the edge of any smooth shape in a digital image and you’ll see it isn’t a hard line. Edge pixels blend gradually from the shape’s color into the background. This anti-aliasing is what makes curves look smooth on screen, and it causes two different print problems.
Problem 1: halos from the old background
When you remove a white background, the edge pixels keep some of that white mixed into their color. On a light shirt nobody notices. On a dark shirt, those whitish edge pixels form a thin pale outline around the whole design: a halo. The same thing happens in reverse with artwork cut from a dark background and printed on a light shirt.
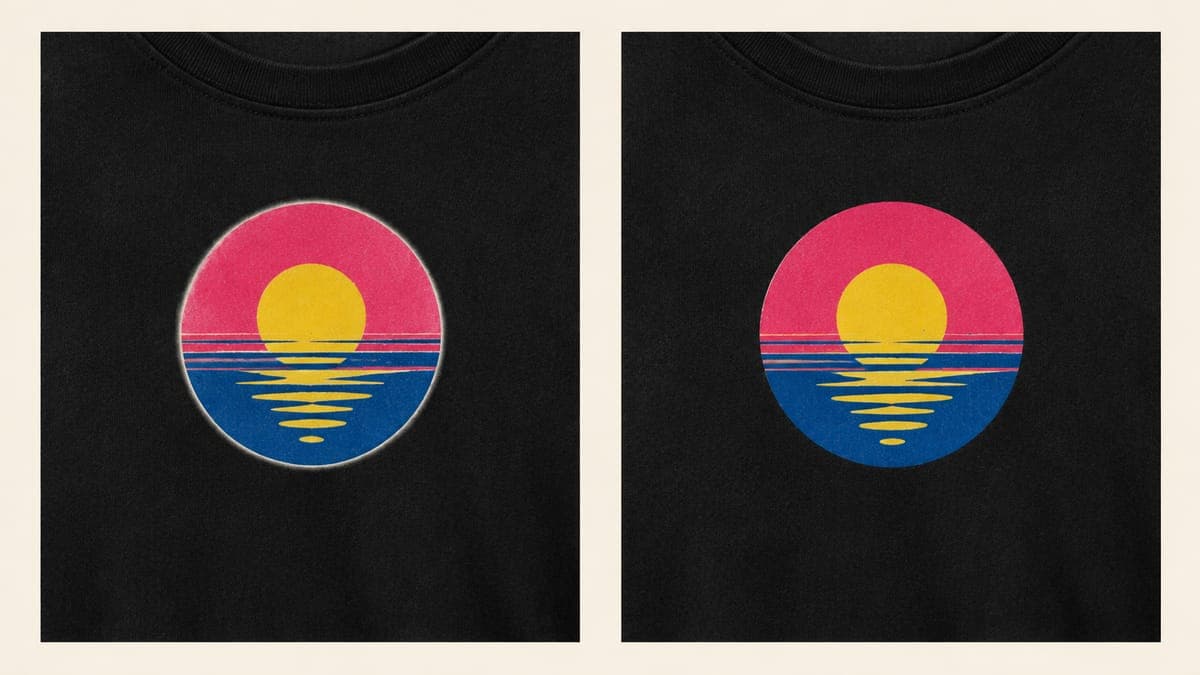
Problem 2: partial transparency on DTG
A pixel that is 40% opaque looks fine on screen, but DTG printers don’t reproduce partial transparency the way a screen shows it. Depending on the printer and the provider’s settings, a half-transparent pixel may print fully solid, as a speckled scatter of dots, or with too little white underneath so it looks faded. The usual culprits:
- Soft drop shadows and outer glows, which are made entirely of semi-transparent pixels.
- Distressed and grunge textures, which leave thousands of tiny, partly transparent specks. If you love that worn look, here’s how to make vintage t-shirt designs that print well.
- Feathered edges and soft brushes that fade out gradually instead of stopping.
- Invisible leftovers, such as a background layer set to 2% opacity instead of deleted, which can print as a faint box.
A one-pixel soft edge is normal and prints fine at 300 DPI. The trouble starts with wide soft fades and with edge pixels contaminated by the old background.
How to remove a white background cleanly
The tool matters less than the method. Whatever you use, the steps are the same:
- Start from the best source. Work from the highest-resolution version of the artwork you have. Removing the background from a small image just gives you a small cutout. If the only version you have is small, upscale it for print first.
- Select the background when it’s a flat color. On flat graphics, a magic wand or color-range selection of pure white is often cleaner than automatic subject detection. For photos and detailed illustrations, use subject selection and refine the mask.
- Catch the enclosed gaps. The white inside letters like A, O and R, or between an arm and a body, is background too. Automatic tools often miss these islands.
- Clean the edge. Remove the white fringe (see the next section) before you export.
- Keep the original. Save the cutout as a new file, so you can go back if an edge looks wrong in the mockup.
| Tool | Cost | Good for | Watch out for |
|---|---|---|---|
| Photoshop | Paid subscription | Precise masks, Remove White Matte, Decontaminate Colors | Auto-selection can miss thin lines and inner gaps |
| GIMP | Free | Fuzzy Select, layer masks, Threshold Alpha | Color to Alpha makes light tones inside your design semi-transparent too |
| Photopea | Free in the browser, with ads | Photoshop-style tools without installing anything | Very large files depend on your computer’s memory |
| Canva | Background remover on paid plans | Quick cutouts inside a simple layout tool | Transparent PNG download also needs a paid plan |
| One-click removers | Often free at low resolution | Fast cutouts of detailed or photographic art | Full-resolution downloads may cost credits; check the edges |
| Vector editors (Illustrator, Inkscape) | Paid / free | Text and flat art, with no background to remove | Export the PNG at the exact print-area size |
Features and pricing change often. Check each tool’s current plans before you rely on them.
Designing in Canva? Our guide to using Canva for print-on-demand covers export settings and what its license allows on products you sell.
If your designs come from AI, the cleanest option is often to skip background removal entirely. Some image models can output a true transparent background, and vector artwork has no background to remove in the first place. POD Made Easy works this way for apparel, sticker and mug designs: the print-ready final is isolated on transparency, any leftover background is knocked out, and near-transparent edge pixels are cleaned up for DTG before you publish.
How to fix halos and rough edges
Once the background is gone, clean the edge. Pick the fixes that suit your artwork:
- Remove the white matte. In Photoshop, Layer → Matting → Remove White Matte (or Defringe) recolors edge pixels using the colors just inside them. The Decontaminate Colors option in Select and Mask does something similar for photographic edges.
- Shrink the edge by 1–2 pixels. Contract the selection (Select → Modify → Contract in Photoshop, Select → Shrink in GIMP) and delete what’s outside it. At 4500 × 5400, losing a pixel or two is invisible.
- Harden the alpha. Snap nearly transparent pixels to fully transparent and nearly solid ones to fully solid. GIMP’s Layer → Transparency → Threshold Alpha does it in one step, trading a little smoothness for a clean print.
- Replace soft effects with solid ones. Turn a drop shadow into a solid offset shape, and convert glows and gradients into halftone dots: tiny, fully opaque dots that print cleanly and still read as a soft fade.
- Add a deliberate outline. A solid stroke in a color that suits the shirt hides minor edge issues and helps the design stand out on busy or heathered fabric.
- Rebuild it as a vector. For text and flat artwork, a vector has no old background baked into its edges, so there’s nothing to halo. Export it at the exact print size (see how to vectorize an image for print).
How to check a transparent PNG before you upload
Never trust a thumbnail. Open the file in an editor and run these checks:
- Checkerboard view. Transparent areas should show your editor’s gray-and-white checkerboard all the way to the canvas edges, with no white box and no faint haze.
- Black and white backgrounds. Add a solid black layer under the design, then a solid white one. Black exposes white halos and specks; white exposes dark fringes.
- Zoom to 200–400%. Pan around the entire edge of the artwork, including the insides of letters and small gaps.
- Real shirt colors. Preview the design on the garment colors you plan to offer, especially black, navy and heather colors, as well as white.
- Confirm the alpha channel exists. In Windows File Explorer, a PNG with transparency usually shows a bit depth of 32 under Properties → Details. On a Mac, the inspector in Preview (Tools → Show Inspector) shows whether the image has alpha.
Export settings: PNG-24 or PNG-32, never JPG
All that cleanup is wasted if the export flattens your transparency. Pick the right format first:
| Format | Transparency | Use it for POD? |
|---|---|---|
| PNG-24 with transparency (also called PNG-32 or RGBA) | Full: 256 levels per pixel | Yes. The standard for shirts, stickers and mugs |
| PNG-8 | On/off only in most apps, 256 colors max | No. Gradients band and edges turn jagged |
| JPG | None: there’s always a background | Only for full-bleed art such as posters |
| GIF | On/off only, 256 colors max | No |
| SVG | Full (vector) | As a master file; export a PNG unless your provider accepts SVG |
Then get the details right:
- In Photoshop’s Export As, choose PNG, keep Transparency checked and leave Smaller File (8-bit) unchecked.
- Don’t flatten. Flattening merges your layers onto a solid background. If you need a single layer, merge the visible layers instead.
- Leave matte off. If an exporter offers a matte color, set it to none, or it will blend your edges into that color.
- Stay in RGB. Export in RGB, usually sRGB, unless your provider asks for something else.
- Size it right. Export at the print-area size in pixels, such as 4500 × 5400 for a full-front tee, rather than letting the provider stretch a smaller file (our t-shirt design size and DPI guide has the numbers). For stickers, the transparent edge usually becomes the cut line; see sticker design size and cut lines.
- Protect the file in transit. Some chat apps and photo services convert PNGs to JPG and quietly fill the background. Move print files through cloud storage or as email attachments instead.
Design for dark and light shirts
Even a technically perfect transparent PNG can look wrong on the wrong shirt color. A few habits help, and our guide to the best-selling t-shirt colors covers which colors to offer in the first place:
- Mind your whites. On a white shirt, the white parts of a design disappear. On dark shirts they print as bright white ink. Decide which you want before you publish.
- Watch dark-on-dark. Black linework vanishes on black and navy shirts. Add a light outline, or offer the design only on lighter colors.
- Consider two versions. Many designs work best as a light-shirt version and a dark-shirt version, each with adjusted outline and text colors, published on the shirt colors it suits.
- Use the shirt as a color. Knockout designs let the fabric show through parts of the artwork on purpose. They print well when the knocked-out shapes are hard-edged rather than soft.
Try this idea in POD Made Easy
“Retro sunset badge with a mountain silhouette and a thick solid outline, four flat colors, isolated on transparent background”
Clean transparency without the cleanup
POD Made Easy delivers finals on a true transparent background at the exact print-area size, knocks out leftover backgrounds, snaps semi-transparent edge pixels for DTG and spell-checks any text before you publish. No halo hunting at midnight.
Start your free trialQuick checklist before you publish
- The file is a PNG with a real alpha channel, not a JPG and not a painted checkerboard.
- There’s no white box, faint haze or stray specks anywhere on the canvas.
- Edges look clean on black, on white and on a neon test layer at 200% zoom or more.
- Shadows, glows and textures are solid or halftone, not semi-transparent.
- The file is exported at the print-area pixel size, in RGB, without flattening.
- The mockup looks right on every shirt color you offer.
Transparency problems are invisible until a customer opens the package, which makes them an easy way to lose a buyer’s trust. A two-minute check on a checkerboard, on black and on white is the cheapest quality control you can do.
Frequently asked questions
- Why does my t-shirt print have a white box around the design?
- The file still had a background. Either it was a JPG, which can’t store transparency, or the PNG’s background was never removed. On colored shirts, a white background prints as white ink. Re-export as a PNG with a truly transparent background.
- What causes a halo around my design on dark shirts?
- Edge pixels that still contain the old light background color. When the background was removed, the soft edge kept some white mixed in. Remove the white matte, shrink the edge by 1–2 pixels or harden the alpha, then check the design on a black background.
- Should I use PNG-8, PNG-24 or PNG-32?
- Use PNG-24 with transparency, which some apps call PNG-32 or RGBA. PNG-8 is limited to 256 colors and, in most apps, simple on/off transparency, which bands gradients and roughens edges.
- Can DTG printers print semi-transparent colors?
- Not reliably. Results depend on the printer and its software, and partly transparent pixels often print faded, speckled or with a visible edge, especially on dark shirts. Convert soft shadows and glows to solid shapes or halftone dots.
Keep reading
More design guides
Design
How to Make a Vintage T-Shirt Design That Prints Cleanly
Make a vintage t-shirt design with retro palettes, sunset stripes, badges, halftones and distressing, without the semi-transparent pixels that ruin DTG prints.
Sep 24, 2026 · 10 min read

Design
100 AI Prompts for T-Shirt Designs That Print Well
100 original AI prompts for t-shirt designs, sorted by style and niche, plus a simple prompt formula and print-safe add-ons that work in ChatGPT or Midjourney.
Sep 24, 2026 · 19 min read

Design
How to Design T-Shirts With AI That Sell (2026 Workflow)
How to design t-shirts with AI that sell: pick a buyer, write prompts that print well, draft cheaply, make a print-ready final, proofread and build on winners.
Sep 24, 2026 · 11 min read